My blog has moved!

You will be automatically redirected to the new address. If that does not occur, visit
http://www.ellesnewenglandkitchen.com
and please update your bookmarks.

Monday, March 31, 2008

I promised you Brownies! And look--two different kinds!


Mmmmmmm, broooooownieeees. Whether you like them cakey or fudgy... fudgey (I've GOT to get a correct spelling on that. Firefox is telling me that those are both wrong, hehe.), everyone loves brownies. I usually go for fudge-like (that works! woo!), but I won't turn a cakey brownie away, either. I'm an equal-opportunity-brownie kind of girl. Give me a brownie and a glass of milk, and I'm happy!

In the last couple of weeks, I've tried two new recipes, and come across so many more I want to try. Who isn't always on the lookout for the perfect brownie recipe, right?

The two that I ended up choosing were not for their sinfully-bad-for-you and chocolate-loaded qualities, but for their "Hey, this looks interesting, let's see what they're like" qualities.

And guess what? They're both fantastic brownie recipes! Both rich and chocolatey, but not so bad for you that you'll feel guilty indulging in one or two.

First up was Whole Wheat Brownies from Made Healthier. We've really been trying to get more whole grains into our diets and into our kids, hehe. They were really good! I'll definitely make them again! They were cakey, moist and very chocolatey. They didn't taste like whole wheat, either, and the kids liked them--that was the most important test!

I knew I wanted to get more chocolate into them, so I melted some chocolate to add to the batter. I also keep some instant coffee on hand just for brownies. Never. For. Drinking. Ever. But add some to brownie batter, and it makes them have a deeper, more intense chocolate flavor. Geez, I'm getting hungry just thinking about them! I also doubled the recipe because we're a big family, and an 8x8 pan will be gone faster than you can look at a brownie and yell "I call that one!" The recipe calls for 1/3 cup vegetable oil, and since I was doubling it, I melted 1/3 cup of butter, along with between 1/4 and 1/2 cup of bittersweet chocolate. You can see the original recipe here. And I'll post it here with my changes:

Whole Wheat Brownies

1 1/3 cup white whole wheat flour
2/3 cup all purpose flour
1 1/3 cup sugar

1/2 cup unsweetened cocoa powder

2 tsp baking powder

1 tsp salt

1/3 cup vegetable oil
1/3 cup butter
scant 1/2 cup bittersweet chocolate
2-3 teaspoons instant coffee granules
1 cup milk
1/2 cup water
4 eggs

1 tsp vanilla
1/2 cup semisweet chocolate chips

Heat the oven to 350.
In a large bowl, combine the dry ingredients.
Melt the butter and the bittersweet chocolate together in the microwave. Start with about one minute, then 15 second increments, stirring after each 15 seconds until the chocolate is melted.
Stir the coffee granules into the butter chocolate mixture.
In another bowl, combine the oil, butter mixture, milk, water, eggs and vanilla.
Add the wet stuff to the dry stuff, stir in the chocolate chips, and combine.
Pour into 2 greased 8 inch square pans.

Bake for 25-30 minutes.
Cool (if you can wait), and cut into squares. They tasted even better every day, too. Until the end of the third day--then they were all gone. ;)


Being served next: Raw Vegan Brownies

I was so intrigued when I saw this recipe. I read it over at 28 Cooks--another great blog! It has only 5 ingredients, and no baking--hence the name Raw Vegan Brownies. ;)

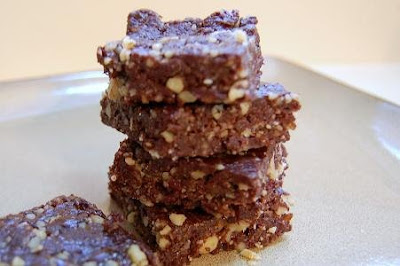
My husband loves bars and things made with dried fruit, so I knew right away he'd love these. I mentioned the recipe to him and he hounded me until I made them, hehe. They are fabulous! Really. I can't even believe how chocolatey they are. They're like a little miracle brownie! I don't think you could make these without a food processor, though. You've got to process it all together until you have the dried fruit chopped ultra fine and mixed thoroughly with the other ingredients. I should add that I doubled the recipe, planning to make 2 pans, but pressing half the mixture into one 8 inch pan was going to give us really thin brownies, so we put all of it into one square pan and got what you see in the photo.

Raw Vegan Brownies

1/2 c dried pitted dates--not the sugary coated chopped ones--you're using a food processor anyway, get the whole pitted dates
1/2 c dried cherries

1/4 c cocoa powder

1 c walnuts

3 tbsp agave nectar

(you can use carob powder and honey in place of the cocoa and agave, if you prefer)

Add all ingredients to food processor and process until everything is thoroughly combined and chopped. Press into a square pan, and freeze for one hour. (To make it easier to cut them into bars, I lined the pan with plastic wrap and then lifted the whole thing out after freezing. Peel off the plastic and cut into bars.) Remove from freezer, cut into squares, and store in the fridge. Deelicious, and rich, so cut them into small squares.

Stumble Upon Toolbar

Saturday, March 29, 2008

Tagged!!

Jessy, over at Baking Blondie has tagged me to do "Five Things You Don't Know About Me." She has a great blog--you should check it out!

Five Things:

1) I used to have dark purple and hot pink hair. Really! My mom hated it, hehe.

2) I'm 6 months older than my husband. And if any of you remind me of that, ever--you're toast. hehe.

3) I'm afraid of tubes of bread dough. When I was a kid, I was at the store with my aunt and cousins, and my cousin grabbed a tube and banged it on the side of the display case (remember in the old commercials, the Pillsbury Dough Boy used to pop out of the tube?), and it must have been past it's expiration date, because BOOM! It exploded everywhere. hahaha!! Still scared, to this day...

4) One of our parakeets, Lucky, just showed up in our yard one day. It was in May, two years ago. It's still cool here in May, and we were out in the yard all day. He hung out in our yard the whole time--he was very friendly--he was going from the fence to the tree and then down in the grass, and telling us a huge story, hehe. At the end of the day, it was getting really cool and I didn't know if he'd make it through the night outside, so I got a stick and went up close to him, and he hopped on! I brought him inside, put him in a room, and my husband ran to the store to get a cage and other bird stuff, after lots of begging by the kids. We still have him, and he's got a friend now, too. ;)

5) I met the most wonderful group of friends online--on a cooking site, of course! We've known each other for over five years now, and have all gotten together several times--not all together at once yet, but in different groups. We still haven't worked out a way to schedule a get together for every single one of us at one time. They're like sisters to me, and I thank God every day that we all came together at the same time, in the same place. We've been through a lot together.

So there you go, five more things you didn't know about me!

Stumble Upon Toolbar

Friday, March 28, 2008

It's Springtime in New England! And a cookbook pimp!

It's springtime in New England!

And you know what that means, don't you?


So pretty! The flowers are blooming, the birds are arriving back from the south, the snow is melting....


WRONG!


This is what we woke up to this morning.


Side porch:
Views from side porch:


The park across the street:


The deck in our backyard (notice the pitiful cooler on the right that's just waiting for warmer days so we'll fill him up with ice and cold drinks again...):


I'm in love with New England. I really am. I wouldn't trade living here for anything in the world. And there's something I need to confess. ..

I'm a total freak that L-O-V-E-S snow. I was just telling some friends the other day that I was hoping we'd have one more substantial snowfall before the warmer weather really settled in. Funny, too--the tulips in our front yard are already about 3 inches tall! My daughter and I were just looking at them yesterday. Now they're covered in snow again! Hahaha! Take that, tulips! (Don't get me wrong, I love our pretty tulips, but I also love snow.) I know, I'm a freak.

The kids even have a snow day today! They were thrilled, of course, hehe.


Bonus! A cookbook pimp!


I've known Nikki (Canarygirl) for over 5 years now, and she is one of the best friends a girl could have. She's like a sister to me. She is also a fabulous cook, and makes the most delicious food. I've tried tons of her recipes over the years, and I haven't had one fail--not to mention that they're all easy and packed with flavor! She's been blogging for over a year now, and has been posting her recipes online since we met.

View her blog here.

Anyway, she has a cookbook out, and I want to recommend it. Not only does it have her original recipes, but also her amazing photos. That girl is creative!

And I know, we all have a lot of cookbooks, but if you're looking for something different, please give this a look--it's a gorgeous book, full of good food and lots of color.

You can see the book here.

Thanks for checking it out!

Stumble Upon Toolbar

Thursday, March 27, 2008

Random Thursday Thoughts: Guacamole, The Foodie Blogroll, and Today's Tunes


First up--guacamole! Is there anyone that doesn't love fresh, cool, chunky guacamole? Anyone? Bueller? Ok, I guess there's gotta be at least a couple of people that don't like it. So more for us!

Guacamole is one of the easiest, and most satisfying things to make. It's so freaking good. The trick is to get good avocados. I always get Hass avocados, but in a pinch, the bigger, green ones are good, too. You can read everything you ever wanted to know about avocados here. If you're buying Hass, look for the darker, almost black ones, that yield a bit to a little squeeze. If they're all hard and green, you can ripen them at home pretty quickly in a paper bag. But be careful--they're funny little things and go from "We're ripe, yay!" to "Um, we're just going to lie here and get moldy...in the next sixty seconds, ok?" ugh!

So cut them in half carefully, from top to bottom, whack the pit with your knife, carefully! and twist it out. Take a knife and carefully cut lines vertically and horizontally while the halves are still in the peel. Then run a spoon under and around the flesh and scoop it out. Did I mention to be careful? Please do!

So here we go! I've made this so many times that I don't use a set recipe or measurements. You can eyeball your avocado/tomato/onion ratio. And if you hate tomatoes or despise onions (but why would you?) you can skip those. Your guacamole won't mind.

Guacamole

3 avocados
1 lime
1 or 2 cloves garlic, finely minced
1 medium tomato, chopped and seeded
1/2 a small onion (red, white, sweet--doesn't matter)
1 jalapeno, remove seeds and ribs if you want it mild--leave them in if you like it hotter
chopped cilantro
coarse salt

Get your avocados ready, and put the chunks in a medium bowl. Cut the lime in half and squeeze the juice from one half over the avocado. Add the garlic to the bowl and mash it all up some more with a fork, but leave some chunks--chunks are good!

Add the tomato and onion and some salt, then cilantro and jalapeno. Oh, leave out the cilantro if you hate it-- I'll forgive you. Mix it up and give it a taste, and add more lime juice if it needs it. I usually use almost one whole lime.

When you've got it just right, cover it and put it in the fridge to let the flavors mingle amongst themselves. About 1/2 an hour or so. But if you're like us, you'll grab a bag of corn chips and sample some (ok, a lot) before it even hits the fridge. And don't bother with this business of sticking an avocado pit in the guacamole to keep it greener, longer. It's a lie. From the Save the Avocado Pit People--SAPP, for short. Put a bit of plastic wrap right on the surface, and keep it in the fridge. It'll last into the next day, but no longer than that. And if it's a little discolored on top, just give it a stir.

Serve this with chips, in wraps, over a spicy salad, on tacos, in burritos, etc.


Next up--The Foodie Blogroll! Have all you food bloggers joined yet? What are you waiting for? It's a very cool way to get more exposure for your blog, give you more traffic, and a good way to get to know other foodies like yourselves. PLUS you'll find more great blogs to read!

There are three requirements:

1) Your blog must be at least one month old with at least five posts. (I joined one month to the day after I started blogging, hehe.)

2) Your blog must be at least 80% about food.

3) You have to put the Blogroll in your sidebar in plain sight where it can be seen by Jenn, the genius who started it all. It's nice and not in-your-face. See it in my sidebar, there on the right?

Here's a blurb from Jenn, on Foodieblogroll.com:

Why Should I join The Foodie Blogroll? What’s in it for me?

The Foodie Blogroll is the first of its kind and is one of the fastest growing online communities for foodies. With over 1000 members spanning the globe in less than a year, there is a reason for its popularity. It is the first blogroll created just for foodies like you. When I started my food blog, I went looking for a blogroll for food and cooking related websites and there were none to be found. So I decided to create my own! This is all about building the best community online for foodies! Imagine what having over 1000 websites linking to you can do for your blogs traffic and Google or Technorati ranking.

A great benefit for joining is a forum for members (and other foodies alike) to hang out with each other and get to know each other and talk about our favorite subject – FOOD. There are also contests and your blog could also be featured as part of my Finest Foodies Friday – where I feature the best blogs from the Foodie Blogroll! If you are not a member, you can’t be featured.

_______________________________________________________________


And there's forums on her site, too, for contests and getting to know other bloggers. So drop Jenn an e mail and get started soon!


And lastly, Today's Tunes!

I've been listening to Puddle of Mudd. I love these guys! It's a great album, lots of fun, and really, don't we all know at least one Paranoid Flake?

Also in rotation the last couple of days is Flyleaf . I love this album, too. Definitely makes kitchen time (what I mean is cleaning time) more enjoyable.


Being served soon: Brownies, Cornbread and Tuna Orzo Salad. But not all together, because... ewww. hehe. Stay tuned...


Stumble Upon Toolbar

Monday, March 24, 2008

Garlic Shrimp, Chocolate Cake, and now I'm kicking myself for not making Easter Dinner!


This past Saturday was my husband Billy's birthday, so we of course had a party for him, and had everyone over that evening. Earlier in the week, I figured that if we were going to see everyone on Saturday, why not just skip making a huge Easter dinner? Not that I minded making one, it's just that I didn't really feel like entertaining two days in a row, you know? And that way, we could pack up the kids and get out of the house on a (sort of) mild, sunny day. Good plan, right? Right!

Until this morning, when I was reading some blogs and came across this post at culinography. I'll wait while you go have a look. Looks delicious, doesn't it? That's why I'm kicking myself for not making an Easter dinner. I love those leftovers! Ham sandwiches, quiche or frittata, and any other stuff that includes ham and your leftover veggies and stuff. Why didn't anyone remind me? Why didn't someone tell me that I'd miss out on the glory of big holiday dinner leftovers? Why????? Ah well, I guess I could pick up a ham at the store this week. Maybe even on sale! Whatever the next holiday is, I'll be counting on you guys to remind me of this, ok? Thanks in advance. ;)

So! When I asked Billy what he wanted for his birthday dinner, he said he wanted to make pizza. What? HE wanted to make pizza? He's the official pizza chef in the house, not me. So I said "Are you sure?" He was! By the way, if you're wondering if I'm talking about my husband or a kid named Billy--yes, Billy is my husband. I cannot ever get used to calling him Bill. He was Billy when I met him (we were 19! God!), and he always will be.
He's Bill to everyone else, though. But I'm off topic! He wanted to make pizza. His pizza is the best, so I wasn't going to argue. I was in charge of toppings. We had plain cheese, garlic shrimp, and meatball for my sister in law, because she's allergic to shellfish, poor thing, and we kind of like having her around!

The garlic shrimp is one of the easiest things in the world to make. It's all in the timing. Get everything ready to go ahead of time and that way, you can add it to the pan without having to run around the kitchen. Otherwise, you'll end up with rubbery overcooked shrimp, instead of the tender little morsels they are. This recipe is adapted from an old friend's recipe. It makes some sauce, and is great over pasta, or with crusty bread for mopping up the sauce. You can double everything but the shrimp if you want more sauce. It also makes an amazing pizza topping! Just remove them from the sauce, but save that for something else, like dipping your pizza crusts in!

Garlic Shrimp

5 or 6 tbsp olive oil
4 cloves garlic, minced
pinch of red pepper flakes
1/3 cup white wine (you know the rule, use wine you'd actually drink!)
1 lb shrimp, shelled and deveined
coarse salt
1 tbsp lemon juice
1 tbsp butter
chopped parsley to garnish

Heat oil in a skillet over medium heat, and add the garlic. Cook slowly for a minute or two to flavor the oil with garlic, but be careful not to burn it.
Add the red pepper flakes and increase the heat to medium high.
Add the wine and let this go for about a minute, then add the shrimp.
Season with salt.
Cook until the shrimp is almost done (this will only take a couple of minutes.)
Add the lemon juice and butter to finish the sauce.
Garnish with finely chopped parsley.


The chocolate cake was really good! It didn't look perfect--my cakes never do. But it was homemade and tasty. I used the recipe for Decadent Chocolate Cake from Whole Grain Gourmet. It was delicious! Not quite as fudgey...fudgy? fudge-like as I had hoped, but since we're trying to get more whole grains into our diet, we wanted to try this one. It was moist and dense though. It didn't taste whole grain at all, and the guests all loved it. It was topped with their ganache, as well. All in all, really good cake! And I managed to get one lamo shot. Be nice, I'm not the best when it comes to cake presentation!

So what did we do on Easter Sunday? We hit the road and went to the beach. It was so sunny and blue. A very nice change from the dirty gray snow that's left over, and the grass that's not yet lush and green.


Stumble Upon Toolbar

Saturday, March 22, 2008

Date Bars


Actually, Date Nut Bars. This is my grandmother's recipe, and as far back as I can remember, her and my mom always made these. Every holiday, and if we were lucky--just because. When I was old enough, I wanted to help, too. Eventually, my mom decided she was sick of baking (can you even believe that?! hehe), and the job became mine. Yay! I was more than happy to take over.

I still love making these, and they bring back such memories. You know, I thought I'd talk a little about my mom today. She passed away a little over a year ago, and I just realized...it's still too hard for me to do it. Maybe in a few more years, when the pain isn't like a punch in the stomach. I miss her terribly, and just typing this little bit about her has made me all teary.

But sorry to bring you down! Let's talk about the date bars. They are perfect. I really mean that. I don't know, are date bars like brownies or chocolate chip cookies? Does everyone have their own favorite way to have date bars? These are the only ones I've ever had, so I'm not sure. I do like variety, but I don't ever mess with these. Ever.

Except this time. I lied...I did mess with them. I cut the sugar in the filling to a generous half cup, instead of the usual three quarters. For the crust, I used half white flour and half white whole wheat flour. We couldn't tell the difference. In fact, my 12 (almost 13. Dear God, help us, hehe) year old came in the kitchen to have one. She tasted and went on and on about how great they were. It was THEN that I told her they were half whole wheat flour. She stopped, thought about it, shrugged, took a second one and left the room. Ha! Another convert. ;) My husband, who loves when I use whole wheat flour, was thrilled, and said these were the best batch I'd ever made. I love that man.

These are extremely simple to make. But you have to do two things. You have to be sure to press the bottom crust firmly, but not *too* firmly, in the into the pan. And after you put the filling over and add the top crust, again, press sort of firmly, but not too firmly. Make sense? Use your judgement. You obviously don't want a bunch of loose crumbs tossed in the pan, but you don't want to squish it down to a fraction of an inch, either. You with me? Good. Next, bake it for 25 minutes. Not a minute more! I'm serious on this one--no tweaking here. As long as your oven is running at a fairly normal temp (make sure your 350 isn't actually heating to something like 390), 25 minutes is all these need. Oh, and you should let them cool as much as you can before you cut them. I know, it's too hard to wait for stuff to cool, and I hardly ever do. So I'll look away while you cut a square to try. ;) Oh, that was three things, wasn't it?

Finally, the recipe!

Date Nut Bars

Crust:

1 3/4 cups oatmeal

1 1/2 cups flour

1/2 tsp baking powder

1 tsp baking soda

3/4 cup butter, melted

1 cup brown sugar

1/2 tsp salt


Date Filling:

1 lb chopped dates

3/4 cup sugar (you can cut this amount to 1/2 cup)

1 cup water

1 Tbs butter

1 tsp vanilla

1 cup chopped walnuts


Make the filling:

Boil dates, sugar, and water until thick, about 5-10 minutes.

Add 1 Tbs butter, the vanilla, and the walnuts.

Set aside to cool a bit.

Prepare the crust: Combine all dry ingredients with the melted butter.

Firmly press half of the mixture into a lightly greased 13 x 9 pan.

Cover with filling mixture.


Look at that datey, nutty goodness!


Top with remaining half of crust mixture. Press lightly.

Bake at 350 degrees for 25 minutes.

Really, I mean it--no longer than that!

Cut into squares when cool, and store in an airtight container.


To print this recipe, click here!


I'm sure my mom would approve. :)

Stumble Upon Toolbar

Tuesday, March 18, 2008

Fresh Summer Salad


This salad is one of the easiest things to make, ever. It's amazing to me (Yes, still. I'm terribly easy to please.) how you can take a few simple, common ingredients, and turn them into something that tastes so incredibly good.

That's what this salad is. I made it the other day, and not for the first time, I've made it plenty of times--and my husband and I stood at the kitchen island almost inhaling it like we had been wandering in the desert without food for two weeks. He had picked up a soft, squishy loaf of fresh italian bread earlier in the day, and we were ripping off hunks of bread like savages and eating them with the salad. And by the way...there's a lot to be said for eating something like this with the one you love. It's drippy with olive oil and juice from the tomatoes...embarrassing to have oil dripping down your chin? No--just the opposite--it's a very sensual eating experience...and what were we talking about? hehehe.

Serve this with any number of things--it's so versatile! It's great with the hummus (ous) and some feta on wedges of pita bread, or as a fresh side dish, or, like my husband and I had some of it, right out of the bowl you made it in along with some fresh bread. I found this recipe online somewhere years ago, but it's been so long that I don't remember where. Thank you, whoever you are! oh, and even if you don't have garden tomatoes, which we don't have yet, obviously--it's SO worth splurging on a few vine ripened tomatoes from your grocery store to make this. It's a burst of summer while it's still...let me check...43 degrees outside, with snow on the ground.

Fresh Summer Salad

4 cucumbers, peeled or not, up to you--seeded and cut into chunks
4 tomatoes, seeded or deglopped, as my friend Jane says, and cut into chunks
1/2 cup fresh parsley, roughly chopped
1/4 cup white wine vinegar
3-4 TBSP olive oil
1/4 tsp salt
1/4 tsp coarsely ground pepper

Toss all ingredients together and chill. Or don't bother to put it away, just stand there with some bread and eat. Store any leftovers in the fridge.


And here it is with some of the Roasted Red Pepper Hummus, some feta and some pita bread wedges:

Stumble Upon Toolbar

Roasted Red Pepper Hummus


What can I say about hummus? I can say that some people spell it hummous! I know that here, we don't spell it with the "ous", but now that I've typed hummus, it looks funny. It looks wrong even though I know it's perfectly fine to spell it that way.

I can also say that no matter how you spell it, it's goooood. It's addictive, isn't it? And if you've never tried it, you're missing out! I'll bet you're thinking "Sure, Elle. I'll just put my shoes and jacket on (unless you are where it's warm, then forget the jacket) and go get some. Because you told me to."

Surprise! You don't have to! You can make it right at home with a few simple ingredients that I'll bet most of you already have on hand. And if you don't, I'm sorry. You're gonna miss out. Until you go shopping and remember that I suggested you get these things. You won't be sorry! Unless you make it and hate it. In that case, you never read this post and you never heard it from me. *innocently whistling*

Seriously, hummus (ous) is so easy to make. It takes maybe 5 minutes. You can use a food processor or a blender, but honestly, a processor is easier. But I have made this in a blender, before I had a shiny, powerful KitchenAid. Either way, it's still easy, you just have to open the blender occasionally and poke the stuff around to get it all blended.

This is great with corn chips. I can seriously pig out on a bowl of hummus and a pile o' chips. Oink. But my absolute favorite way to have this hummus is with Fresh Summer Salad, little chunks of feta, and pita bread wedges. Talk about oink! It's like nachos, only not bad for you! Well, I suppose if you eat too much, you may feel a bit queasy, but man, it's hard to stop. So good!

Oh, a side note: hummus is usually made with tahini, a sesame seed paste. I always used it, and after a while, ended up throwing a lot of it out, because you use such a small amount to make hummus. I was never sure how long it lasted after opening, and really, no one wants to poison their family and friends, do they? (I'm sure someone can tell me how long it lasts!) So I started using sesame oil instead. I always have that on hand, and I use it all the time. I substitute the same amount of oil instead of tahini. It works fine and tastes great.

Roasted Red Pepper Hummus

  • 1 (15 ounces) can chickpeas (garbanzo beans), rinsed and drained
  • 1 (6 ounces) jar roasted red peppers
  • 3 Tbs lemon juice
  • 1 1/2 Tbs tahini or toasted sesame oil, either is fine
  • 1 clove garlic
  • 1/2 tsp ground cumin
  • 1/2 tsp cayenne pepper (more if you like)
  • 1/4 tsp salt
  • splash of lime juice, to taste

  1. Put all of your ingredients in a food processor or blender, and pulse or blend until smooth.
  2. Transfer to a serving bowl and serve immediately or store in an airtight container in the fridge.
It doesn't get any easier than that!

To print this recipe, click here!


Stumble Upon Toolbar

Sunday, March 16, 2008

Almond Joy Muffins


Chocolate and coconut. Coconut and chocolate. Right up there with chocolate and peanut butter, I think. Well, really, aren't there a ton of things that just seem to be destined to go with chocolate?

At Halloween, after we've gone out to Trick or Treat, my three youngest always gladly hand over their little bite sized bits of chocolate and coconutty goodness, otherwise known as Almond Joys and Mounds. My oldest--she loves them, too, and won't give 'em up. hmmmph.

*side note: I'm laughing my butt off, because I was googling to get pics of the candy bars to post here. Almond Joy was easy. But Mounds...wow! Google Mounds ---> Images, and see what you get. hahaha! Are we supposed to believe those are real?!?

Anyway, back to the food...if you can get that image out of your head, hehehe. I was craving the choco-coco combo, and also craving muffins. I love muffins. All kinds of muffins. Muffins are our friends. I came up with these, working off of another recipe I have for fruit muffins. I changed things around, added stuff, took out the fruit, and came up with these. They're not sweet, like you think they might be--they're just right. Make sure you get coconut milk that isn't sweetened! If you can't find it, you can use regular milk, no big deal.

Almond Joy Muffins

Makes 6 large muffins, or 9 or so regular muffins

Ingredients

2 cup flour

3/4 cup sugar

1 TBSP baking powder

1 tsp salt
2 eggs
1/4 cup oil

1/4 cup melted butter

3/4 cups coconut milk, or regular milk

1 tsp almond extract

3/4 cups coconut, plus a little more for sprinkling over the tops

1/2-3/4 cup chocolate chips


Directions

1. Preheat oven to 350°.
2. Sift the dry ingredients together in a large bowl.

3. In a small bowl, whisk the eggs, oil, butter, coconut milk and almond extract.

4. Stir into flour mixture.
5. Fold in the coconut and the chocolate chips.
6. Grease 1 (6 muffin) muffin pan.

7. Fill the tins about 3/4 full, then sprinkle the tops with the remaining coconut. (an ice cream scoop makes the tins easy to fill and makes your muffins the same size)

8. Bake for 25-30 minutes. Mine were done at 25, so start testing then. For regular size muffins, check them after 18-20 minutes.
9. Cool in the pan for about 5 minutes, then serve. But if you're like me, you'll grab a molten hot muffin right out of the oven and pig out. Cooling is for whimps. ;-) Kidding!

To print this recipe, click here!


Stumble Upon Toolbar

Saturday, March 15, 2008

Yogurt Cheese


Have you ever made your own cheese from plain yogurt? It's so easy! And so, so good. I first tried this with the help of my dear friend, Lizzie. She makes it quite often, and had to talk me all the way through it, hehe! What can I say, I was very nervous the first time. Was I doing it right? Would it work? Did I add the right herbs? Would I make my fridge explode? Would the world as we know it come to a sudden halt if I screwed up my yogurt cheese?

Thankfully, it worked! And on my very first try, too! That's because it's so easy, even a kid could do it. Seriously. But there's one very important thing--your yogurt can not have gelatin in it, or it won't work. You can look on the label and it'll say if there's some in there or not.

Up until now, I'd only made savory yogurt cheese. But when my friends and I were all trying this out, one of them bought vanilla yogurt instead of plain. I thought, wow, that would be good anyway, and you could add cinnamon and raisins, or orange zest and cranberries, etc.

I decided this time to use plain, but do a sweeter version, with orange zest, dried cranberries, and honey. It was SO good! Was, because it's all gone, hehe. Try it on your bagels for a healthy alternative to cream cheese. I don't know why, but I just don't care too much for low fat cream cheese, but the yogurt cheese is something I really love. It also makes a great addition to sandwiches and wraps!

One more thing--when Lizzie makes it, she adds the herbs and spices first, then drains the liquid out to make her cheese. This is the way I've always done it, too. This time, I wanted to do half sweet and half savory, so I drained the yogurt first, then divided it to make the different kinds. If you're doing a savory one, I recommend adding the herbs before draining. In my opinion, it needs that time to really develop it's flavor. However, the sweet version was perfect. I added the stuff to it after draining, and it was fine. You can decide which way you'd want to do it.

Lizzie's Yogurt Cheese (savory version)

32 ounces (2 lbs) Lowfat plain yogurt

Herbs of your choice (I typically use oregano and basil, but a mix of your favorites, or even a blend like herbes de provence or a cajun or italian spice mix would work, about 1 tablespoon of each)

Minced garlic (optional, to taste - I like about 4 - 6 cloves)

Sea or kosher salt (about 1 teaspoon)

Fresh ground black pepper, to taste

Chopped sundried tomatoes (optional)

Chopped kalamata (or your choice) olives (optional)

In a large bowl, mix together yogurt, salt, pepper, herbs, and whatever optional ingredients you want. You can also do the mixing right in the yogurt container.

Prepare a large strainer over a pot to catch the water from the yogurt. Line the strainer with cheesecloth, making sure that it overlaps the strainer and can be pulled up.


When yogurt, spices, etc., are thoroughly combined, pour into the cheesecloth lined strainer.

(the yogurt in this shot has no herbs in it, because I decided to add to it after draining)
Loosely gather extra cheesecloth and drape over the top.

Refrigerate overnight, making sure to check it occasionally and pour out strained water.
Here is the drained, plain cheese, and at this point, I split it into two portions, and added herbs and garlic to one, and orange zest, honey and dried cranberries to the other. All amounts are to your taste:


After about 24 - 30 hours, turn out the yogurt cheese onto a serving plate. Garnish with a bit more salt, pepper, a drizzle of very fruity olive oil, and a sprig or two of fresh herbs, if you like. Surround with crackers and olives (if you used them/like them), and enjoy. I often drizzle enough olive oil that it pools a bit around the cheese, so you can get some of it when you scoop the cheese out.


Here you can see the herbed cheese in the front, orange cranberry cheese in the back:


And a better shot of the cranberry orange:


I hope you'll try to make your own yogurt cheese! You can add whatever you like--do you feel like sweet or savory? How about garlic and chive, or cinnamon raisin? Experiment with different combinations, and don't worry, your fridge won't explode if it doesn't work. Because it'll work!!! hehehe.


Stumble Upon Toolbar

Tuesday, March 11, 2008

Oven Baked Sweet Potato Garlic Fries


Ok, so they're not the prettiest things ever...but they sure do taste great! I've been making oven baked sweet potato fries for a long time. One thing's for sure--it's nearly impossible to get them crispy, but I have learned a few things:

a) They get crispier if you don't use foil. They just stick to foil, so use an oiled rimmed baking sheet.
b) Don't try to cook them on parchment (and this is probably the only time I'll say something negative about my beloved parchment paper). They end up as nothing but a soggy mess, lying in puddles of sweet potato juice. Nothing you'll want to eat, trust me.
c) The broiler helps, but you've got to watch them carefully. After the cooking time is up, I usually switch the broiler on to low, and give them a few minutes. This helps.

The method I usually use is to season them first with cumin, chili powder, garlic and onion powder, and sometimes, some adobo. Always coarse salt and pepper, but you decide--it's all up to you.
Toss them with olive oil and all the spices, then bake them. Good stuff.

But last week, I read Lori's post at Made Healthier, about Baked Garlic Fries. What? Toss them in oil and garlic after cooking? Genius! So naturally, I wanted to try it with sweet potatoes. Me likey! It worked great, like I knew it would! Here's my take on her recipe:

Oven Baked Sweet Potato Garlic Fries

Preheat oven to 400°.
You can either peel your potatoes, or give them a good scrubbing, which is what I did. Oh, and I used 3 sweet potatoes this time.
Cut them into wedges or like fries.
Put them on a rimmed baking sheet and drizzle with olive or vegetable oil, coarse salt and pepper.

Bake for about 40-50 minutes, flipping the fries over at the halfway point. When time is up, see if you want to turn the broiler on for a few minutes, but watch them carefully if you do.
About 10 minutes or so before they're done, heat a few tablespoons of olive oil over low to medium heat.
When the oil is hot, add in about 3 (or more or less, depending on what you like) garlic cloves that you've chopped. Be careful not to burn the garlic, you just want to soften it, take the raw "edge" off, and flavor the oil.
Toss the baked fries with the garlic and the olive oil, and add more salt to taste.
Serve them now!
See? They won't win any awards for being beautiful, but they are delicious just the same.


Stumble Upon Toolbar