My blog has moved!

You will be automatically redirected to the new address. If that does not occur, visit
http://www.ellesnewenglandkitchen.com
and please update your bookmarks.

Sunday, August 31, 2008

The Daring Bakers Do Eclairs!


I was SO excited when our August recipe was unveiled. I love eclairs. My mom used to work in a bakery and I remember her bringing these home once in a while. We loved them!

Little did I know how tough these were to make. I've seen them made before and they look like they're a snap to make. Riiiiight. Maybe after making them 100 times, I'd be better at it, too. I made them twice. The first time, they deflated and were way too flat. So I went to the DB'ers forum and checked out what others had to say.

I tried doing them a different way the second time, with a bit higher oven temp, and slightly different cooking times. Also adding water in the bottom of the oven to release steam to help them puff up and rise.

They rose higher and got puffier, but as they cooled, the bottoms kind of receded back up inside the tops. Weird, right?
I still don't think I could have cut them in half, so filling them with a pastry bag and tip was the way to go. This worked well on most of them--a couple of them were still just to thin. Oh, and poking a knife in to kind of open them up helped, too.

Eclairs, my loves...I'm gonna eat you. I don't care if you're fugly!

And before I forget--this month's recipe was chosen and hosted by MeetaK at What's For Lunch Honey? and Tony Tahhan at TonyTahhan.com. GORGEOUS blogs, so get on over there and check them out! You can also find the eclair recipe at their sites.

We had to use the pate a choux part of the recipe, and either the chocolate glaze or the chocolate filling--at least one of the chocolate elements, but the rest was up to us. So I put my thinking cap on and came up with two variations.

#1--Peanut Butter Pastry Cream with Chocolate Glaze and Chopped Peanut Garnish

#2--Maple Pastry Cream with Chocolate Glaze and Crumbled Bacon Garnish.

Yes, that's right! BACON! And it's incredibly delicious with the chocolate glaze and the maple cream. The peanut butter ones are delicious, too, but the maple-bacon is definitely my favorite.

The recipe for the Maple Pastry Cream can be found here, and click here for the Peanut Butter Pastry Cream.


Peanut Butter Eclair Time...Peanut Butter Eclair Time...


Is there anything that bacon can't make better? I don't think so.

Would I make these again? I'm not sure. They taste amazing, but after two attempts and flat...ish results, I was discouraged. My husband reminded me that some people have to do these many times before they get them perfect, and I know he's right. He also told me these are the best eclairs he's ever had, so I guess that makes the trouble all worthwhile, right?

Individually, every single step was a cinch. It was getting the little suckers to puff and stay that way that was tricky. I think I need a French chef for a neighbor. Now that would be helpful! At any rate, I'm so glad to have tried pate a choux! The dough is so simple to make, and I'd like to try making cheese puffs one of these days.

Be sure to check out the Daring Bakers Blogroll to see how other DB'ers did the eclairs!

Stumble Upon Toolbar

Tuesday, August 26, 2008

Jousting for Brownies


The Royal Foodie Joust, that is. We get three ingredients every month, which are chosen by the previous month's winner. Last month, Kittie from Kittens in the Kitchen won, and her ingredient choices were whole grains, ginger and citrus. And if you haven't joined The Foodie Blogroll yet, have a look around! It's a great, supportive community of foodies. And word on the street is that Jenn, the Queen, is about to launch an entirely new site packed with good stuff. (ok...not on "the street." I read it in the blogroll forum. I can't lie to you guys. I don't get out enough to hear things on the street. Except maybe "Mom, I dropped my gum, but don't worry, it won't make a mess. I put it back in my mouth." eek! Or the always classic--and loud, "Mom!! I farted, hahaha!!!!")

Whole Grains (or at least they have to start out whole)
Ginger
Citrus

Orange and Ginger, Friends 4Ever.


My mind flew in a dozen different directions. Sweet, savory, savory, sweet. I have a list of things I wanted to make. I actually made two things to enter, and had to think for about a week before I could decide which to post. I'm very happy with both, and will eventually post the other one, but this one is still knocking my socks off. They keep very well in the fridge, and make a great little chocolatey fix when you need one. They're really fudgey/fudgy (Merriam Webster, I need you--call me!) and have hints of orange and ginger. And since they're made with oat flour, I can almost fool myself into thinking they're good for me. Almost.


Ginger Orange Brownies with Ganache Topping

1 (1/2 cup) stick butter
4 oz chopped bittersweet chocolate
3/4 cup sugar
2/3 cup oat flour *
1/4 cup cocoa
2 eggs
1 tsp fresh grated ginger
1/2 tsp vanilla
2 tsp orange zest

Ganache Topping

4 oz chopped bittersweet chocolate
1/2 cup heavy cream
1 tsp orange zest

*Making your own oat flour is so easy! Take rolled or quick oats and whiz them in a food processor or a blender until they look ground and...floury. That's it! Who knew? (Use about 1 1/4 cups of oats to make one cup oat flour.)


Heat oven to 325°.
Line an 8x8 pan with parchment or foil--leave some overlapping on the sides, and then grease.
In a medium pan, melt the butter and chocolate.
Remove from heat and add remaining ingredients--but not the ganache stuff!
Bake 28-30 minutes, but don't over bake.
Cool in the pan for 15 minutes, and then pull them out using the foil or parchment and finish
cooling them on a cooling rack.

Make the Ganache:

Put the chocolate in a bowl.
Heat the cream just to a simmer--don't let it boil!
Pour the cream over the chocolate and let it sit for a minute or two, then stir until smooth and all the chocolate has melted.
Stir in orange zest.


Put the brownies, still in the foil or parchment, back in the baking pan.
Pour the ganache over the cooled brownies and spread it out over the top.
Cool in the fridge until ganache has firmed up.
Remove from the pan again and cut into squares.
Store in fridge. I like to take one and let it sit out for a minute or two to soften up a bit, but they're still good right out of the fridge.


Ginger Orange Brownies with Ganache Topping

Delicious and fudgy, these have hints of orange and ginger ...

See Ginger Orange Brownies with Ganache Topping on Key Ingredient.


Stumble Upon Toolbar

Monday, August 25, 2008

Argentine "Style" Burgers


So what do you do with fluffy and delicious homemade pita breads? Anything you want! But my recipe of choice was Argentine Style Burgers from Fine Cooking. I'd had my eye on the recipe for a while, and when Sarah suggested we try pita breads for our first recipe together, I knew exactly what I'd use them for.

Not only are the burgers easy to make, but they are delicious! I love a good burger, and my choice of toppings on a regular old one are just ketchup, sliced tomatoes and lotsa black pepper. Yep, that's my favorite way to have them. I know! Boring, right? Geez, I've gotta get out more, hehe.

But sometimes I start jonesing for a different burger. When I saw this one, I knew I'd make them, it was just a question of when. And then, pita breads popped into my life (I love you, pita bread!), and that's how these burgers are served. Perfect!

The burgers themselves are flavored with onions, jalapeno (seeded or not, you decide) and garlic, that are quickly sauteed to take off the raw edge. I hate raw veggies in burgers. Not on, but in--they just don't belong there unless they're cooked first, right? They get mixed into the meat along with fresh cilantro, cumin and oregano. And speaking of the meat, I used ground turkey. I know what you're thinking...why turkey? Well, we like it. And I already had some. I like finding recipes that I have mostly everything on hand for already, and this was one of them. They're garnished with lettuce, sliced red onion, and chimichurri sauce, and if you read this blog regularly, you know how I L-O-V-E Zen's recipe for chimichurri sauce. I make it often and we use it on all kinds of things! From steaks, to pork chops also rubbed with the piri-piri blend in his post, to parm crusted chicken, and skillet smashed potatoes. It's fabulous on everything--even pizza! I didn't bother making the one from Fine Cooking, and though I'm sure it's delicious, I already have a favorite--so why mess with perfection?


Anyway, here's the recipe. And please excuse my photos, hehe. They look weird, but the taste of the burgers more than makes up for them! I had planned to make another one up from the leftovers, but as it turns out, we had other plans for them, which you can see at the bottom of this post...

Argentine Style Burgers
adapted from Fine Cooking (contributed by Bob Sloan)


2 tbsp olive oil
1/2 cup finely diced onion
2 tbsp minced garlic
1 small jalapeno, finely diced
kosher salt and fresh cracked black pepper
1 1/2 pounds ground turkey (if you use beef, use 85% lean)
1 1/2 tsp ground cumin
1 1/2 tsp dried oregano
1/4 cup finely chopped fresh cilantro
4 - 6 inch pita breads (or really nice buns--heh!)

To garnish:
thinly sliced red onion
lettuce
Chimichurri sauce


In a small skillet, heat 1 tbsp of the oil over medium heat.
Saute the onion, garlic, jalapeno and 1/4 tsp of the salt for about 3 minutes, and stir occasionally.
Remove to a plate and set aside to cool for at least 10 minutes.
To a bowl, add the turkey, cumin, oregano, cilantro, 1 tsp salt, some pepper, and the onion-garlic-jalapeno mixture.
Get your hands in there and gently mix until thoroughly combined.
Gently shape the meat into four patties (I ended up with five).
You can either cook these on the stove top, which I did, or grill them.
For stove top, heat remaining 1 tbsp oil in a pan over medium high heat. Cook burgers for about 5 minutes on each side, turning only once. (If you're using beef, cook to your liking.)
Cut part of the top off of the pita breads, and serve the burgers in the pitas along with the onion, lettuce and some of the chimichurri sauce.


This is one of my new favorite recipes, and I know we'll be having it again soon. It's fresh and different, and the flavors all work so well together.

So what did we do with the leftovers? We made pizza! Saturday night was pizza night, and I was thinking that the burgers--sliced thinly, along with some of the chimichurri sauce and some cheese would be fabulous. I was right! The only thing I forgot was the thinly sliced red onion on the pizza. D'oh! It would have been perfect on it, but I'll have to try it next time.


I really hope you'll try these! They couldn't be simpler, but the taste is fresh and different. And if you haven't checked out Fine Cooking, you really should. Their recipes are easy and always fantastic. Those of you who gave up Cook's Illustrated because of their mind boggling and stupid behavior may want to spend your subscription money on Fine Cooking instead. :)

So tell me, what are your favorite ways to have burgers?

Stumble Upon Toolbar

Friday, August 22, 2008

It's not a P.I.T.A. to make pita bread!


A few weeks ago, Sarah at Homemade asked me if I'd like to start making some recipes together, and we would blog about our experiences. So of course I said yes! Sarah's a sweetheart and It's like baking in your friend's kitchen, except that she's on the west coast, while I'm on east coast. We'll be doing one or two a month, so stay tuned.

The first one we decided to try was pita bread. And what a great recipe! The dough was a dream to work with. I needed to add more flour during kneading because it was quite sticky, but once you get the texture right, it's all good.

The most time consuming part of these is when you set the dough aside to rise. They've got a 90 minute rise, a 20 minute rest, and another 30 minute rest before baking. But they only take 3 minutes to bake, so that makes up for it right? And even better--when you rip one open--because that's a law, isn't it? You are legally required to rip open a piece of bread when it's hot out of the oven, even if it causes acute pain to your digits. So when you rip one open, you get the aroma of yeasty heavenly steamy bread. You don't even need butter to enjoy these, although, I'm pretty sure there's a law somewhere about hot bread and butter going together.

Come to think of it, there should also be a law about not making blog posts at 12:45 am, too. Can I ramble, or what?


The recipe can be found here at Brown Eyed Baker. I used my KitchenAid stand mixer and let that do the kneading. Ten minutes, and the addition of about 3/4-1 cup more flour and the dough was perfect. I doubled the recipe to get 16 pita breads, because we're a family of 6, and every one of my kids had pita bread (and butter) (wait--my two sons didn't have butter on theirs. The little hoodlums--breaking the warm bread/butter law at such an early age...) for dinner. See? Eight wouldn't have been enough. And my husband and I had them for dinner--in a burger recipe which will be an upcoming post. And if any of you try one recipe from this blog, these burgers would be in my top 5 favorites. mmmmm!

SO! I'm coming to the end of my ramblings. These pita breads are easy to make, and would be really fun to do with the kids. And it's kinda fun to watch them puff up in the oven, too.

Right after kneading, and ready to rise for 90 minutes.

After 90 minute rise, we have the dough that almost took over the world. Or at least my stove top.


Required low-angle shot of doughy balls.


"Almost pita breads! We've got to sit for 30 more minutes! And what happened to our balls?"


Puffy pillows of warm, yeasty, bready goodness.


Thanks Sarah--this was a lot of fun! And the whole family enjoyed the bread. Even the picky ones! (Kids, that is. We didn't have picky bread.) (But I'll bet picky bread doesn't like butter, either.)

Stumble Upon Toolbar

Monday, August 18, 2008

Smokin' Ribs for a Smackdown!


Is there anyone that doesn't like smoked ribs, with a lip smacking sauce to dip them in? Ok, maybe there are a few people that don't, and that's fine. But these might make them change their minds. They're just so damn good!

Do any of you guys read Thursday Night Smackdown? If you don't, you should! Michelle's blog is an adventure in cooking, and doing it with humor and gusto. There are ups and downs, spectacular food and a couple that were better left in the pages of the cookbook they came from. This post and this one come to mind--there's some good reading right there! But Michelle and her cohort/sous chef, Brian, share the good and the bad from their cooking experiences.


In July, Michelle opened up TNS to her readers, for First Thursdays. On the first Thursday of every month, she posts a round up of her reader's submitted recipes. September's Smackdown theme is grilling. And since I've missed the first two, there's no way in hell I'm missing this one! So yeah, I'm early, hehe.

These ribs are fantastic! They're from the book BH&G Smoke Cooking. We've been looking at this recipe for a while, but you know, you gotta plan ahead if you want to smoke stuff (the 13 year old in me just giggled)! So knowing what the TNS theme was, I pulled out this book, and we decided to finally make them. By "we," I mean my husband Billy and I. He's the guy in charge of grilling/smoking.

There's a little out of the way place in the next town over that's a slaughterhouse/retail and wholesale meat place called Lemay & Sons. I never even knew they were there, but I was in search of something else (that will be posted in about a week or so--it takes that long to make it) and they were the only ones that had it. I was directed there by another butcher in the area. Anyway, this is the kind of place you go to for a whole pig or half a cow, or even something as small as a pound of ground buffalo meat. Good to know! They have lots of different cuts of meats and great prices, as well. They didn't have the beef back ribs that we were looking for on that day, so we went with porky baby back ribs. Two racks, totaling 5 pounds, to be specific. We also picked up a couple pounds of that buffalo meat for later. Can't beat $3.99 a pound! That's cheaper than ground beef!

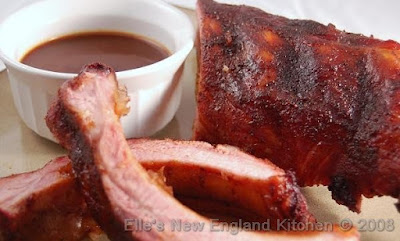
The ribs! Very straightforward recipe, and the book also has some tips on smoking. They're smoked with a simple dry rub, and brushed with a sauce in the last 15 minutes of cooking, with more of the sauce served alongside. The sauce is also very simple, made with bottled bbq sauce, orange, ginger and soy sauce.

We did run into some trouble, though it was no fault of the recipe. Damn thunderstorms that we've had nearly every day this summer. grrrr. Everything was going great, nice fire, good smoke...then a couple hours into it, the sky opened up and poured buckets all over our smoker. After the lightning stopped and we were able to get out and check it, we found the fire had gone out. For whatever reason, we just couldn't get a good smoke going after that and gave up after about an hour. We brought them in the house and gave them a couple more hours in the oven at 200°. Perfect! Still nice and smoky, but also tender and juicy.

Ginger Orange Smoked Baby Back Ribs
adapted from BH&G Smoke Cooking

4 cups mesquite wood chips

Rub
3 tsp regular paprika
3 tsp smoked paprika
3 tsp salt
1 1/2 tsp pepper

5 pounds baby back ribs (2 racks)

Sauce
1 cup of your favorite bottled bbq sauce
1/2 cup orange juice concentrate, thawed
4 tbsp low sodium soy sauce
2 tbsp fresh grated ginger


At least one hour before you want to start cooking, soak the wood chips in enough water to cover them. Set aside.


Combine the rub ingredients and rub it into the ribs.


Combine the sauce ingredients and set aside in the fridge.

In your smoker or grill, arrange the heated coals, half the drained wood chips and a water pan according to the manufacturers directions.
Pour water into pan and place the ribs, bone side down, on the grill rack over the pan.


Cover and smoke for 2 1/2 - 3 hours or until ribs are tender, and brush some of the sauce on the ribs in the last 15 minutes of cooking time.


Add more coals, wood chips and water as needed during smoking time.
Serve sauce with the ribs.


Good lookin' ribs, right?

What's that? Where's the side dish?

We don't need no stinkin' side dish! We can just stuff our faces with ribs and be perfectly happy, hehe. But if I'd thought of it ahead of time, I'd have whipped up some cole slaw to go alongside. D'oh!

Go check out Thursday Night Smackdown and get your entries ready for the first Thursday in September!

Ginger Orange Baby Back Ribs

These are a bit different than regular smoked ribs, because ...

See Ginger Orange Baby Back Ribs on Key Ingredient.


Stumble Upon Toolbar

Friday, August 15, 2008

Ragù alla Bolognese


I'm going to say right at the start that this most likely isn't authentic Ragù Alla Bolognese. But you know what? It's good. It's damn good. And my family loves it. So if it isn't authentic, well, I'll still sleep at night. Because I can get my kids to eat it. With vegetables in it. Big plus in my book. And I'm also not telling everyone "I think this is an authentic recipe!" (not that I ever did...)
See the comments on that recipe for the full story, hehe. ;) Sorry, I'm still a bit gun-shy.

If you're interested, you can read a bit more about Ragu all Bolognese here
.

This one is from Cooking Light. I really do love their recipes--they're always full of flavor, and very easy. This one takes a bit of time--but most of it's simmering time, so it's not very labor intensive. But the rewards are great! This is so freaking good! I've made it twice already in one week.


I only made a couple of changes. I added a couple of garlic cloves, because garlic makes everything better...except maybe your breath. Also, they use whole milk. I made it the first time with half and half, and the second time, I used 1% milk. Good both times! It's also really good with torn fresh basil thrown in at the end. I know, I know...basil isn't a traditional ingredient in this. But it's there in the garden, so yeah, I'm gonna toss some in if I want to.

So there! You tell 'em, Nick!


Ragù Alla Bolognese

Ingredients

1 tablespoon olive oil
1 cup finely chopped onion
1 cup finely chopped celery
2 garlic cloves, minced
1/2 cup finely chopped carrot
1 pound of a mixture of ground pork, veal and beef
1 cup dry white wine
1/2 teaspoon salt
1/2 teaspoon black pepper
1/4 teaspoon ground nutmeg
1 bay leaf
1 (14 1/2 oz) can chicken broth
1 (10 3/4-ounce) can tomato puree
1 cup half and half or milk (I've used both--regular half and half, and 1 % milk.)
2 tablespoons minced fresh parsley

Heat oil in a large pan oven over medium heat.
Add the onion, celery, carrot and garlic, cook 8 minutes, stirring occasionally.
Remove onion from pan and set aside.
Add ground meat to the pan and cook over medium heat until browned.
Add wine, salt, pepper, nutmeg, and bay leaf, and bring to a boil. Cook 5 minutes.
Add the onion mixture back to the pan, then add the broth and tomato puree.
Simmer for about 1 hour, stirring occasionally.
Stir in half and half or milk and parsley, bring to a boil. Reduce heat, and simmer 40 minutes.
Discard bay leaf.
Test for seasoning and add salt and pepper if needed.
Serve over your favorite pasta, and sprinkle with fresh grated parmesan cheese.


Also, I've been fortunate enough to receive a new award, from two different bloggers! Thank you so much to Meryl, from Inspired Bites, and Kelly from Sass and Veracity. These ladies have two of the most gorgeous blogs around, so be sure to check them out!

I get to pass this along to five other blogs, but I'll have to come back and do that later. My husband is making dinner, but I'm his sous chef and he keeps me busy!

Have a great weekend, and as always, thanks so much for reading!


Ragù Alla Bolognese

A delicious sauce to serve over your favorite pasta. Takes ...

See Ragù Alla Bolognese on Key Ingredient.


Stumble Upon Toolbar

Monday, August 11, 2008

That Cookbook Thing II...Rapee Morvandelle (Gratin of Potatoes with Ham, Eggs and Onions)


I think that's my longest post title ever! It's time again for That Cookbook Thing II, and this one's a winner!

Don't forget to check out what the TCT II members did with the recipe:
Kittie at Kittens in the Kitchen
Mike at Mel's Diner
Ruth at Once Upon a Feast
Sara at I Like to Cook
Mary at The Sour Dough
Deborah at What's in My kitchen?
Shaun at Winter Skies, Kitchen Aglow


So, after the Sauce au Cari which was quite bland, I decided to play around with this recipe, and I'm SO glad I did! After chatting with my Bratty friends, I settled on these changes:


1) I upped the onions from 1/2 cup to a whole onion, which was 1 1/2 cups. And I let them get nice and brown and slightly caramelized.

2) I increased the ham from 1/2 cup to 1 1/2 cups.

3) Increased the garlic from 1/2 clove (why just 1/2?) to 2.

4) Along with the fresh chives, I added 2 good pinches of dried tarragon, and a healthy pinch of nutmeg.

5) I didn't use Swiss cheese, but used Edam, and increased the amount from 2/3 cup to 1 cup.

6) I used half and half instead of whipping cream. Oh! I also increased the eggs from 4 to 5, and the half and half from 4 TB to 5. I even thought afterwards, that it could have used a bit more egg, so maybe I'll go with 6 next time.

Also, a couple more changes:

I baked the whole thing in the pan that I sauteed the onions and ham in, pouring the rest right over them, and popping it in the oven. I thought (hoped) there was enough oil left in the bottom to prevent sticking. There was almost enough, hehe. It stuck a little, but was still so delicious! Next time, and there will be a next time--I'll pour it all into a greased separate baking dish first.

I tried to get a couple of good photos, but it was 7:00 pm and rainy when I finished, so no good light. Plus, we were so hungry by this time, that getting a photo of an actual slice was impossible, since we were inhaling it.

I almost forgot--I'm submitting this to The Potato Ho Down! if you love potatoes--and who doesn't--be sure to check out the August round-up!


Here's the recipe, with my changes.

Gratin of Potatoes with Ham, Eggs and Onions

Delicious recipe, great for breakfast, brunch, or even dinner! Adapted ...

See Gratin of Potatoes with Ham, Eggs and Onions on Key Ingredient.


Stumble Upon Toolbar

Wednesday, August 6, 2008

Beat the Heat with Fresh Summer Salad and Roasted Red Pepper Hummus


My friend Grace at A Southern Grace is having a blog event called Beat the Heat. She wants recipes that won't heat up the kitchen during the hot months of summer. (And even though it's only 61° here today--that's fall weather!) And her rules say we can submit new stuff, or things we've already blogged about. I did have a recipe all picked out to make, but we have some guys working at the house, fixing insulation until Friday. So I'm stuck here and can't get to the store. And it's raining. And I have four kids. And it's supposed to rain tomorrow, too. Help. Me.


So I chose two recipes that I originally posted back in March. Did it matter that it wasn't hot out then? No way, because they're good all year 'round. But if tomatoes aren't in season in your area, do yourself a favor and spring for the pretty vine ripened ones. The recipes compliment each other so well, and if you add a couple more things to your plate, you've got a delicious and healthy feast. These are a favorite when you don't feel like heating up the kitchen, or even if you don't feel like cooking. The prep for these is easy--a bit chopping for the salad, and the hummus is all made in the food processor. Add some feta, pita wedges, and good olives if you've got them, and you have a heavenly snack or meal.

You can find the post for the Fresh Summer Salad here
.


And the Roasted Red Pepper Hummus post is here.


Put them together and you get something like this:


It's a nice light, but filling combination. And that salad is so good! It's like a bowl of summer, hehe.

So that's my entry to Beat the Heat. And even though it's cool out today, I'm adding this stuff to my grocery list. If I can ever get out to the store...


Roasted Red Pepper Hummus

This is so easy to make, it takes just minutes ...

See Roasted Red Pepper Hummus on Key Ingredient.


Fresh Summer Salad

Summer in a bowl! This is delicious with my roasted ...

See Fresh Summer Salad on Key Ingredient.


Fresh Summer Salad

Summer in a bowl! This is delicious with my roasted ...

See Fresh Summer Salad on Key Ingredient.

Stumble Upon Toolbar

Tuesday, August 5, 2008

A couple of recipes to share today--Chocolate Zucchini Bread and Skillet Smashed Potatoes

And they have nothing to do with each other, but I've been meaning to post them for a while now. I took a look at my last post this morning and almost fell off my chair when I realized it was posted last Wednesday! That's almost a week! Where has the time gone? I guess part of it is because my husband had a three day weekend last week. We were busy with a day trip (zoo) on Friday, and then the hours and days seemed to flow together and before you know it, it's Tuesday.

I hate that the summer seems to be flying by. And what do you see in every store? Summer stuff on clearance, and big displays of back to school stuff. God, I used to hate that when I was a kid. It always gave me a sinking feeling in the pit of my stomach. Summer went fast enough, and to see retailers pushing it in our faces made me so mad, hehe. I always feel badly when my kids have gotten down to their last one or two weeks of summer, and you can just see it in their eyes. It's looming ahead and they know it. Poor kids, hehe.

Anyway, the recipes. One is for Double Chocolate Zucchini Bread. It's the one I always make, and my kids love it--it's really moist and nice and chocolatey. But I call it "Chocolate Bread" for the benefit of my two youngest kids. They don't know they're eating a healthy dose of a green vegetable, but I do. My two older kids are sworn to secrecy. They don't mind that it's in there--they love the bread! This one was found in the Food Network Kitchens book. They add cinnamon and cloves, but I prefer it without. And so do the kids, in fact. So I've gotten rid of them. Tossed 'em to the curb. (The spices, not the kids.) This also makes two loaves. I love recipes like that, especially with a big family. We can make one loaf disappear just by looking at it. And it also freezes well, so you can put one away for later, too. Also, I think you could substitute plain yogurt for some of the fat in this and it would be great. I'm going to try that this week, and I'll let you all know how it goes. If you want to add the spices (1/2 tsp of cinnamon and a pinch of cloves), sift them into the dry ingredients.


This one is posted for Ben at What's Cooking? for his I Love Baking bi-weekly blog event. Send him your baked goodies!


Double Chocolate Zucchini Bread
adapted From Food Network Kitchens
Makes 2 loaves

2 1/2 cups all-purpose flour
1/4 cup unsweetened cocoa (NOT dutch process)
1 tsp baking soda
1 cup butter, softened
1 1/2 cups sugar
1/4 cup oil
2 large eggs
1/2 cup buttermilk
1 tsp vanilla extract
2 cups zucchini, unpeeled and shredded
4 oz bittersweet chocolate, chopped (they call for finely chopped, but I like to leave some larger chunks, too)


1 Heat oven to 350°.
2 Butter and flour 2 loaf pans.
3 Whisk the flour with the cocoa and baking soda in a medium size bowl.
4 Beat butter and sugar in a medium bowl with a mixer on med high until light and fluffy, about 4 minutes.
5 While you're mixing, drizzle in the oil, then the eggs, one at a time, beating well after each addition.
6 Stir the vanilla into the buttermilk.
7 Mix the flour mixture into the butter mixture in 3 additions, alternating with the buttermilk, beginning and ending with the flour.
8 (Like this--flour, buttermilk, flour, buttermilk, flour) Scrape the sides of the bowl when needed.
9 Fold in the zucchini and chocolate.
10 Divide batter into the 2 pans.
11 Bake until tester comes out clean, about 55 minutes.
12 (be careful, the tester may look chocolatey from the chocolate in the bread--don't over bake) Cool in pans on rack before removing and slicing.


The next recipe is so simple, you don't even need a recipe. Its from Heidi at 101 Cookbooks. If you're not reading that blog, you should be! Amazing food, gorgeous photos, wonderful writing--it's got it all. The recipe is for Lori's Skillet Smashed Potatoes.

You take small potatoes, boil them for a bit, then drain and smash them with the bottom of a glass or a custard cup, and then cook them in a skillet until they're all crunchy and golden brown. A sprinkle of coarse salt and whatever else you like, and you're done. (Herbes de Provence is so good on these...) (hahaha! Spell checker thinks I should change "Herbes" to "Herbies!" Doesn't sound very sophisticated that way, does it?)

They are SO freaking delicious. Like candy. It's hard for me to leave them alone before we even sit down to eat. "What? No, really, we only had ten potatoes to start with! Uh-huh. It looked like more? Way more? Well, what do you know, I'm doing the cooking!"

Go check out the recipe at Heidi's blog and please, please try these. You won't be sorry!

Prepare for Potato Porn...


After being boiled and smashed.

And shown here, with a grilled steak...


Enough potato porn for you?


Double Chocolate Zucchini Bread

This isn't the dry zucchini bread we used to ...

See Double Chocolate Zucchini Bread on Key Ingredient.


Stumble Upon Toolbar