My blog has moved!

You will be automatically redirected to the new address. If that does not occur, visit
http://www.ellesnewenglandkitchen.com
and please update your bookmarks.

Showing posts with label chocolate. Show all posts

Monday, June 22, 2009

Raw Food, Part 3: Raspberry Ganache Fudge Cake

You are all going to LO-V-E this one. If this is the first time you dip your toe into the raw food waters, then let this recipe be the one you try. You will not believe how good this is. It’s from Ani Phyo’s new book, Ani’s Raw Food Desserts: 85 Easy, Delectable Sweets and Treats.

raw-chocolate-ganache-cake-3

Think of the most fudgy, chocolaty, rich cake, covered in a delicious, dark ganache.

Are you thinking of it? It’s a nice thought, right? Now, think of all of the cream and chocolate, butter and sugar. Do you really want to eat those things? I’ve got to be honest, if you’re like me, you do! But you don’t want to feel the guilt after you do. You also most likely don’t want all of the empty calories and bad fats. Here is an excerpt from an interview with Ani Phyo, by way of Crazy Sexy Life:

“Let’s take my Raspberry Ganache Fudge Cake as an example. The cake is made with walnuts, considered a super food by the FDA for it’s high levels of omega-3. Walnuts provide amino acids, vitamins E, A, calcium, iron, and have been found to keep our blood cholesterol levels in check. Walnuts are mixed with raw cacao powder, which is defined as a superfood by the FDA for it’s high levels or antioxidants, which fight free radical damage, premature aging and illness. I use dates, a whole food fruit, to sweeten and to bind together the nuts and cacao powder into a flourless cake texture. Dates are full of fiber, potassium, vitamins, minerals, and antioxidants. All of the ingredients in my cake are good for you super foods.

On the other hand, the baked version uses bleached white flour that’s been stripped of any nutrient value. It’s sweetened with refined white sugar and empty calories, and uses eggs and butter, which contribute to high cholesterol levels. The baked version doesn’t offer much nutritional value.”

Plus, avocados are good for you. So you don’t have to feel one bit of guilt eating this icing!

I only had to make one substitution, and that was in the icing. I had just enough cacao to make the cake, and had to use regular cocoa for the icing. But the rest of this cake is completely raw. In the recipe, they don’t specify raw walnuts, but that’s what I used. If you don’t use raw, it’ll still be delicious, but technically not raw.

raw-chocolate-ganache-cake-2

Do you remember that dark, rich chocolate cake covered in ganache that I asked you to think about? Guess what?! You can have that cake! And you can eat it without an ounce of guilt, because Ani’s version is packed with things that are good for you. But when you’re eating it, you may feel that “knee-jerk guilt” reaction like I did. Because it’s that good. I’m serious!

This recipe got eight thumbs up from the kids, and four more from my husband and I. I hope you’ll try it! You won’t be disappointed.

raw-chocolate-ganache-cake-4

Oh! For easy serving, and no messy cake slicing, I made this recipe into eight cupcakes. Just divide the “batter” into about eight equal portions, and press into a cupcake pan. A little chill in the fridge (about 5 minutes), and a nudge with a knife, and they easily come out. And while we’re on the subject, when mixing this up in the food processor, let it go until you can’t see bits of the nuts anymore. I also gave it an extra squirt or two of raw agave. You may see some of the walnut oil coming out, but just go with it, and press them into the pan, or into 2 cake layers. **For these photos, I stacked two cupcakes like a layer cake, with icing between. Find the recipe by clicking here! And in case you’re wondering, you can’t taste the dates, or the avocado.

This is the most decadent chocolate cake you’ll ever “uncook!”

raw-chocolate-ganache-cake-5

Stumble Upon Toolbar

Tuesday, March 31, 2009

Chocolate Glazed Donut Muffins

chocolate-glazed-donut-muffin-8

Cravings. I’m one of those people that can’t stop thinking about them once they hit me. I have to satisfy the cravings to get them out of my head. And they’re for all kinds of things, like the rest of you, I’m sure. A very common one for me is spaghetti and meatballs—I crave that all the time! My family is lucky they don’t eat it every week. Though, I don’t suppose they’d mind…hmmm…I know I wouldn’t!

But that’s not what this post is about! Cravings, yes. Spaghetti and meatballs, no. I had a craving for a Chocolate Glazed donut. Could not stop thinking about them. But do I really want a deep fried, full of fat, greasy donut? Well, maybe, but should I have one? Hell, no! So I went for the next best thing.

Yes. Cake for breakfast. Also known as Muffins. My friends, muffins. I love them! These are no exception—they were so. Damn. Good. And very easy to make—a bonus!

chocolate-glazed-donut-muffin-6

Chocolate Glazed Donut Muffins

To print these recipes, click here!

makes about 9 muffins

2 cup flour
scant 1 cup sugar
1 Tbs baking powder
1 tsp salt
1/4 tsp Cake Spice + 1/4 tsp nutmeg
2 eggs
1/4 cup canola oil
1/4 cup melted butter
3/4 cup milk
1 tsp vanilla extract

chocolate-glazed-donut-muffin-crop-2

Heat oven to 350 degrees.
Sift the dry ingredients together in a large bowl.
Mix in the eggs, oil, butter, milk and vanilla.
Grease the muffin pans. Divide the batter between the muffin cups--an ice cream scoop works great!
Bake for about 18 minutes or until a tester comes out clean.
Cool in pan on rack for about 5 minutes, then turn on out on rack to cool.
Cool completely before glazing.

chocolate-glazed-donut-muffin-5

And here is the recipe for the glaze, from King Arthur Flour. King Arthur is the only flour I use, ever. It’s such great quality and never lets me down. And have you checked out their site? Bakers Heaven!

Chocolate Glaze

1/2 cup (3 ounces) semisweet chocolate chips
2 tablespoons (1 ounce) butter
1 tablespoon plus 1 teaspoon light corn syrup (I use Golden Syrup)
1/4 teaspoon vanilla extract

Melt the ingredients together over low heat or in the microwave, stirring often. Add extra corn syrup if needed to make a smooth, shiny glaze. Yield: about ½ cup glaze.

If you’re using sprinkles, get them on there right after glazing the muffins so they’ll stick. And then let the muffins sit for a bit so the glaze can set up. The easiest way (for me) to glaze them was to put the glaze in a bowl that’s kind of narrow at the bottom, so the glaze isn’t too shallow. If it is, you’ll be bumping the muffins on the bottom of the bowl and won’t get a pretty glaze. chocolate-glazed-donut-muffin-2

Stumble Upon Toolbar

Tuesday, March 17, 2009

Thinking Outside the Cereal Box…

chunky-monkey-muffins-and-fig-quick-bread

And I’m here to prove it! I was recently contacted by Katharine Schuler from U.S. Mills. She wanted to know if I would be interested in trying some of their products. One of them is Uncle Sam Cereal—we buy that pretty often at Trader Joe’s, so I said yes, please! She asked what I’d like to try, but I left it up to her—though I did add that I have four kids, so if she could tuck a few kid things in there, that would be great. My kids get so excited when a package arrives, but so bummed when there’s nothing in it that they think is cool.

Katharine packed a box so full of stuff, it was like a puzzle. I don’t think I could have ever repackaged it if I had to, hehe. But I was so surprised, and the kids were thrilled! U.S. Mills doesn’t just have cereal, they have cookies, graham crackers, 100 calorie graham cracker snack packs, hot oatmeal---if it’s for breakfast, they probably have it. Have a look around their site—I’ll bet you see something you want to try, or have already tried and had no idea it was from them.

So I had all of this cereal, and aside from eating it in a bowl, I knew I could find something else to do with it. I had a quick look at the recipes on the site, and messed around with a couple. I’m happy to report my experiments were successful!

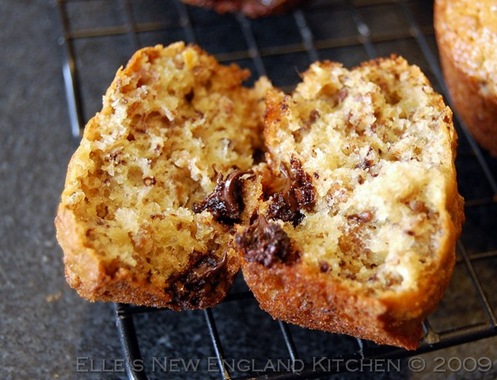
You all know how much I love muffins—they’re an excuse to have cake for breakfast. So I went with those first. And came up with these Chunky Monkey Muffins. What’s not to love about banana and chocolate? Nothing! And adding a healthy dose of good for you Uncle Sam Cereal was perfect. Gave them a little crunch, and the kids loved them. They were like “Cereal? In a muffin? Have you gone nuts, Mom?” But I knew they’d love them. And I was happy they were getting some good grains into their systems.

chunkymonkey5

Chunky Monkey Muffins
Makes 2 dozen

To print this recipe, click here!

3 1/2 cups Uncle Sam Cereal (Original)
1 cup sugar
1 1/2 cups all purpose flour
1 cup whole wheat pastry flour
1 tsp salt
2 1/2 tsp baking soda
1 1/2 tsp baking powder
2 smallish bananas (1 cup total mashed banana)
2 cups milk
2 eggs
1/4 cup canola oil
1 cup chocolate chips

chunkymonkey2

Preheat oven to 375.
Combine all dry ingredients in a large bowl.
Combine wet ingredients in a medium bowl.
Add the wet stuff to the dry stuff, fold in chocolate chips.
Fill muffin cups 3/4 full.
Bake for about 18 minutes, until tester comes out clean.
Cool in pans for a few minutes, then remove to a rack to cool.

chunkymonkey

Look who was hoping I’d drop a muffin…sorry, Hamilton!

chunkymonkey7

A couple of days later, while looking at the bounty of cereal in the pantry, I decided it was time to try something else. The Erewhon Raisin Bran said “Ooooh! Pick me! Pick me!” So yay, it was the lucky cereal of the day. And it had a recipe on the back for Apricot Nut Bread. I didn’t have dried apricots, but I did have dried figs, and just about everything else it called for, so I got to work and came up with this Fig Nut Bread. It’s very moist and dense, almost like a gingerbread that’s studded with raisins, figs, and nuts. It very much reminded me of Morning Glory Muffins, in fact! It was totally delicious.

figbread4

Fig Nut Bread
Makes one loaf

To print this recipe, click here!

1 1/2 cups Erewhon Raisin Bran
3/4 cups whole wheat pastry flour
1 tsp baking soda
1/2 tsp baking powder
1/2 tsp salt
1 1/2 tsp Cake Spice
1 egg
1/4 cup canola oil
1/2 cup agave or honey
1 tsp vanilla
1/2 cup applesauce
3/4 cup diced dried figs
1/2 cup boiling water
1/2 cup chopped walnuts

figbread2

Heat oven to 350.
Pour the boiling water over the figs and set aside.
Grease a loaf pan.
Combine all dry ingredients in a large bowl.
In a medium bowl, blend the egg, oil, agave, vanilla and applesauce together.
Add to the dry ingredients and stir; fold in the figs (and any leftover water from the figs) and nuts.
Pour into loaf pan and bake for about 45 minutes or until tester comes out clean.

figbread3

SO the moral of the story is…get out and look for these cereals and other good things from U.S. Mills. And stop looking at cereal like it’s only good for eating in a bowl with cold milk. Although that’s cool, too.

But start thinking outside the cereal box!

Stumble Upon Toolbar

Wednesday, February 11, 2009

Mexican Hot Chocolate Muffins and an Award


My inspiration for these came from of course, Mexican Hot Chocolate. I saw some somewhere online and decided to translate the cinnamon-laced chocolate drink to my my favorite little hand-held-excuse-to-have-cake-for-breakfast, muffins.

It wasn't very difficult--a basic chocolate muffin, and add some cinnamon and chocolate chips for good measure. And then a nice chocolatey, cinnamony streusel over the top. I found the streusel here, and just added a good dose of cinnamon to it. It's so good! Could've sat there and eaten the streusel with a spoon. A little crunchy that way, but so tasty.


These are my entry to Grace's Cinnamon Celebration. I love Grace! She makes the most delectable sweet things that constantly make me say "I want that!" And she's got a thing for cinnamon. Lots of cinnamon.

The winner of the Cinnamon Celebration is getting some Vietnamese Cinnamon bark. That's a good reason to enter right there! Head on over and give her your best cinnamon recipe!


Mexican Hot Chocolate Muffins

Muffins:
2 cups flour
1 cup brown sugar
1 TB baking powder
1 tsp salt
1/3 c unsweetened cocoa
1 1/2 tsp cinnamon
1 stick (1/4 pound) butter, melted
1/4 cup canola oil
3/4 cup milk
2 eggs
1 tsp vanilla extract
1 1/4 cups chocolate chips

Streusel:
1/3 cup of sugar
1/4 cup of flour
2 TB cocoa
1 1/2 tsp cinnamon
2 TB of melted butter


Heat oven to 350. Grease a 12 cup muffin pan.
Sift the dry stuff together, and make a well in the center.
Add the butter, oil, milk, eggs and vanilla and chocolate chips.
Mix well, but don't overdo it.
Fill the muffin cups evenly.


Mix the streusel stuff until it's crumbly and top each muffin with some.
Bake for 17 minutes or so, and check for doneness.
Cool in pan for a few minutes then remove to a rack.
A cooling rack, not the old torturing device.
And really, I hope you don't have one of those lying around.
Because then you're probably too mean to make nice little streusely muffins.

To print this recipe, click here!


The Sisterhood Award


This award comes from Giz and Psychgrad at Equal Opportunity Kitchen. They are two of the sweetest ladies in the food blogging world, and I'm happy to have met them through their blog. Thank you, ladies! Now, all of you, get on over there and check them out--they have tons of wonderful recipes!

Here are the rules:

The rules for recipients are:
- Put the logo on your blog or post.
- Nominate at least 10 blogs which show great Attitude and/or Gratitude!
- Be sure to link to your nominees within your post.
- Let them know that they have received this award by commenting on their blog.
- Share the love and link to this post and to the person from whom you received your award.


I happily pass this award along to these lovely blogs and sisters in blogging (in no particular order):

1. Kelly at Sass & Veracity
2. Kat at A Good Appetite
3. Grace at A Southern Grace
4. Shelby at The Life and Loves of Grumpy's Honeybunch
5. Deborah at B More Sweet
6. Lori at Recipegirl
7. Nikki at Canarygirl.com
8. Judy at No Fear Entertaining
9. Shaye at Smarter Than Pancakes
10. Dawn at Vanilla Sugar

Stumble Upon Toolbar

Monday, December 22, 2008

Chocolate Minty Cookies and Holiday Wishes


Mmmmm, mint and chocolate. As good as, maybe even a little better than peanut butter and chocolate? I don't know, that's a tough one. Given a choice with chocolate--I'll almost always go with mint.

I was grocery shopping and saw that they had Andes Mints on sale. Pass those up? No way. I knew I wanted to bake something with them. It was either that, or be faced with eating all of them. Cookies immediately came to mind. I did a search and found that there was pretty much one Andes cookie recipe. The one where you place a whole candy over the hot cookies and let it melt there, which looks good. Then there's this one, from Erin. That looks great too, right?

But I wanted to do something different. I started with a basic chocolate cookie, but instead of chocolate chips, I chopped up the mints, coarsely, so you get chunks, and added those to the batter. The result? Delicious cookies! You can immediately taste the mint in them, which is good. Some of the chocolate melted directly into the cookies. They are a cakey cookie, which isn't my first choice, but still, they're very good--almost like little brownie bites. Everyone still loves them--I can see right now that our supply of them is almost gone, so that's a good indication of yummy cookies.


Next Time:


I'd definitely leave larger chunks of the mints. I cut each one into roughly three pieces, so maybe just cut them in half next time.

I'll probably search out a chocolate cookie base that'll be chewier, since that's my favorite kind of cookie.

All in all, I'd make these again for sure, just tweaking the cookie part. But if you like soft, cake-like cookies, you'll love these!

To print this recipe, click here!


makes approx 60 cookies


1 cup butter (2 sticks), softened

1 3/4 cups sugar

2 eggs

2 tsp vanilla extract

3 cups all-purpose flour

2/3 cup unsweetened cocoa

1 tsp baking soda

1 tsp salt

1/2 cup milk

2 (28 piece) boxes Andes Mints, coarsely chopped


Heat oven to 375.

Beat the butter, sugar, eggs and vanilla in mixing bowl until fluffy.

Combine the flour, cocoa, soda and salt, then add alternately with the milk--blend well.

Stir in the mints.

Drop by teaspoons on parchment covered baking sheets.

Bake 8-10 minutes--don't over bake!

Cool for a minute on the sheets and remove to cooling racks.


Stumble Upon Toolbar

Monday, December 15, 2008

Holiday Baking, Week 5: The EASIEST Chocolate Truffles you'll ever make


I know, it's not really week 5, more like 8 or 9, but...stuff happens. Hopefully, this easy--but incredibly delicious recipe will make up for it!

I've made chocolate truffles before, and I wouldn't say they're hard to make, but messy. These are simple, but not messy at all. They're even easier than making fudge, I swear! And anyone lucky enough to be gifted with some of these will love you forever. But don't let them know how easy it is--let them think you're a chocolate making genius. Let them offer to do something for you, in return for some of your amazing truffles, lol!

This one is from Donna Hay's Christmas book. If you don't know Donna Hay, you should! Her recipes are simple, but fantastic. I dare you to look through one of her books and not find 30 recipes that you want to try immediately.

This has two ingredients. Well, three if you count cocoa for dusting the truffles. Ok, four if you add Raspberry Chambord, like I did. Not in the original recipe, but I couldn't resist! But still, that's only four ingredients for decadent chocolates that you can use to bribe your friends.

Are you ready for this extremely complicated recipe? Let's go!

Chocolate Truffles
by Donna Hay

To print this recipe, click here!

1/2 cup heavy cream
10 1/2 oz dark chocolate, chopped
cocoa powder for dusting
if you're adding another flavoring, like the Chambord--about 3 TBSP

Isn't that pretty chocolate?

In a saucepan over medium heat, bring the cream to almost a boil.
Add the chopped chocolate and stir for one minute.
Remove from heat and stir until completely smooth.
Stir in the Chambord, or your choice of liqueur. This is optional, but so, so good in the finished truffles!
Pour into a square pan (her recipe says 6", but I only had and 8" pan, and it was fine) that you've greased and lined with parchment paper. Don't grease the paper. I cut two sheets of parchment to fit, one sheet going one way, the other going the opposite way, so there were "handles" for lifting on each side.
Refrigerate for two hours or until firm.
To serve, lift the truffles out with the paper, cut into squares, and dust with cocoa powder.


Let them come to room temp for about 20 minutes before you serve.
Will keep in fridge for 10 days.

Now how easy is that? And just wait till you taste them! And yeah, they're not round, but then again, you didn't have to get messy rolling them, did you? ;)


Stay tuned for another giveaway, coming very, very soon! It's something that'll make cooking during the colder months a little more convenient...and a lot tastier, too.

Stumble Upon Toolbar

Sunday, December 7, 2008

Chocolate Cake, Marry Me!


Yes, I'll be Mrs. Chocolate Cake, ok? Think my husband will mind? He can be Mr.- Mrs. Chocolate Cake.

This cake. This cake....oh my goodness. Anyone that knows me, knows that my favorite kind of cake is chocolate.
So for my son's birthday, I asked him what kind of cake he wanted. Is it wrong that I totally steered him toward chocolate cake with chocolate frosting? (Don't worry. He loved. This. Cake.) We had the idea of making a giant sort of Ring Ding cake. I know, some of you might not know what a Ring Ding is. Poor souls, hehe.


Anyway, I had the killer cake recipe, and I had the killer frosting recipe, but I needed a filling recipe. I was in a hurry, and looking back, wish I took more time to find a good recipe for that, too. Don't get me wrong, the one I used is delicious, but not great for layering between two big cake layers. I used a whoopie pie filling that I'd used before...for whoopie pies, of course. It didn't hold up well to the cake layers, and before I knew it, I had a cake slide going on. Damn.

But I kept on. I poked a couple of chopsticks through the top and stuck it in the fridge to try and set it more. After 20 minutes or so, I frosted the sides with the chocolate frosting and set it back in the fridge. When I frosted the top a little later, it was still sliding, so the chopsticks went back into the top.

And you know? When it was time to serve it, it was a little lopsided, but it was for family, and they don't really care. Thank goodness, right? lol!

The cake recipe is from Epicurious. I can't even say enough good things about the cake. It's easy to make, it's dense and chocolaty, it's moist, and most important, the taste is out of this world! It's my new official chocolate cake recipe. It's my new best friend.


The filling is also from Epicurious.
I've made these whoopie pies before and they're another great recipe. Unfortunately, the filling just doesn't hold up to heavy cake layers. Whoopie pies? Yes! Cake filling? No!


And you can't have cake without frosting, can you? I don't make frosting very often, but when we do have frosting, it's this one. It's perfect, like the recipe title says. I got this recipe from a friend a few years ago, and haven't made another one since. It's incredibly simple, but homemade--so it tastes great. It's dark and chocolaty, and nice and creamy--good for spreading on cake. Please don't skip the sifting the sugar step--you don't want to have lumpy frosting, do you?


Perfect Chocolate Frosting

6 oz. semisweet chocolate
1/2 cup heavy cream

1 cup butter, cut into tablespoon sizes

2-1/2 cups confectioners' sugar, sifted


Place a large bowl, filled halfway with ice, in the sink (a bowl that is large enough to hold the pot that you will cook the frosting in).
In a medium size pot over med low heat; melt chocolate, cream, and butter.
Stirring constantly, cook the mixture until all of the butter and chocolate melts and thickens, about 5-6 minutes.
Do not boil.
Remove pot from heat.

Whisk in the sifted confectioners' sugar until mixture becomes smooth (approximately 1 minute).
Put the pot on top of the bowl of ice. (Be careful to not allow any ice from the larger bowl to get into pot with the chocolate mixture.)
Beat with an electric mixer on low speed for 4-5 minutes until frosting becomes smooth, thick, and fudgy.
Remove from ice.
Spread onto cooled cake layers.
The frosting will thicken as it sets up.
If the frosting gets too hard to spread, put back on low heat and stir constantly until you get the spreading consistency desired.


So even with the leaky filling, this cake was awesome. My son kept thanking me for making him such a great cake for his birthday, and my other son has requested the same one for his birthday. Hopefully I'll find a sturdier filling by then!

That's it. No more talking. I'll show you how good this cake was.


**Warning! The following images may not be suitable for those of you with good table manners. Notice that one kid isn't even bothering with the formality of a utensil.


I think if I'd tried to get a bite of that slice, I'd have lost a limb. That was the last slice of cake, by the way. I had a flock of vultures hounding me the entire time I was taking photos, one even had a fork at the ready! That last series of pictures happened over a period of about 45 seconds. Piggies.

Stumble Upon Toolbar

Monday, November 3, 2008

Holiday Baking, Week 4: Peanut Butter Pretzel Cookies


And oh my gosh, are they good! I have been thinking about mixing pretzels in a peanut butter cookie for about a month now, and I just got around to making them yesterday. I'm also behind a week in my holiday baking series! Stupid cold/flu/knock-you-on-your-butt thing I had. But I'm slowly emerging from my cocoon of tissues and my (nearly) drunken stupor of cold meds, and feeling more like my old self. (Is that a good thing, I wonder? hehe!)


The idea for these came from...well, I don't remember where it came from, but I think it was from one of those candy bars with the chocolate/pb/pretzel combo--my daughter had one a while back. I have a little list I keep near my laptop with ideas for stuff, and this has been on there for a while. I wrote "pb cookies with pretzel pieces and chocolate." I also have a few lime and coconut ideas kicking around on the list. Why lime and coconut in October/November? I have no clue. Cravings, I guess.

These are so easy--just a regular peanut butter cookie, but you add in broken pretzel pieces. I also put a few chocolate chips on top of each one before baking, along with a nice sprinkling of kosher salt. Does it sound funny? Because they taste so good! the kids love them, too. This makes a nice chewy cookie, with some crunch from the pretzels, and a little salt and chocolate action happening on top. And a little bit of peanuts, from the crunchy peanut butter.


The cookie recipe is based on a pb cookie recipe by Sheila Lukins, from her USA cookbook. It makes a nice chewy cookie, with crispier edges. It has 1/2 cup shortening in it, and if you'd rather use all butter, feel free to change that. I find that in these, the shortening gives me the crispy edges and chewy centers.


Peanut Butter Pretzel Cookies
Adapted from Sheila Lukins USA Cookbook Makes 5 dozen good sized cookies.


2 1/2 cups all-purpose flour
1 tsp baking powder
1/2 tsp baking soda
1/2 tsp salt
1/2 cup butter, at room temperature
1/2 cup solid shortening, at room temperature
1 cup packed brown sugar
1 cup granulated sugar
1 tsp vanilla extract
2 large eggs
1 cup chunky peanut butter (I used an organic pb from Trader Joe's)
1 cup salted pretzel pieces
chocolate chips (I always use Ghirardelli Bittersweet ) and kosher salt for toppings


Heat oven to 350°.
Sift together the flour, baking powder, baking soda and salt, set aside.
Cream the butter, shortening, sugars, and vanilla in a large bowl with an electric mixer at medium speed until light and fluffy.
Add eggs one at a time, beating well after each addition, then mix in the peanut butter.
Add the flour mixture a cup at a time and beat at low speed to mix well.
Add pretzel pieces, and turn mixer on low to mix them in and break up any pieces that are too large.
Shape the dough into 1 inch balls and place on parchment lined baking sheets about 2 inches apart.
Press each cookie twice in each direction with a fork to make the classic pb cookie criss-cross design.
Press about 3 chocolate chips gently into each cookie--no need to squish, be gentle.
Sprinkle each cookie with a pinch or two of kosher salt.
Bake 10 minutes. Let cool on sheets for about 2 minutes and transfer to cooling racks.
***Do not over bake! They'll be pale when you take them out of the oven, and will continue to cook
on the sheets for a couple minutes. If you over bake them, they won't be chewy anymore.


Peanut Butter Pretzel Cookies

An idea that's been kicking around in my head ...

See Peanut Butter Pretzel Cookies on Key Ingredient.

Stumble Upon Toolbar